Integrating Zend Framework and Doctrine
Proceed with caution!
This article was written a long time ago (2008) so it is probably not relevant anymore. Keep that in mind.
This article will guide you through the steps needed to set up a project using both the Zend Framework and Doctrine. In a step-by-step way, we will set up a simple message board application.
Before we start
While I tried to keep this article simple, this is not meant as an introduction to both technologies. I suggest you play with both technologies seperately, before trying to combine them. Both have good documentation to get you started: Zend Framework Quick Start and Doctrine’s My First Project. Akra’s Zend Framework Tutorial is also a very good introduction.
The Zend Framework has a use-at-will architecture. This means you are free to use those parts you need, whereas in other frameworks, it’s more an all-or-nothing decision. This use-at-will architecture is great: it allows us to develop true Zend Framework applications, without using the ZF database abstraction: Zend_Db. While Zend_Db isn’t a bad technology, it is still quite low-level and close to the underlying database. Using Doctrine, you can manipulate your data like objects, without worrying about the database too much.
Zend Framework gives you a lot of freedom in how you build your applications. In other words: it doesn’t force a fixed project structure on you. In this article, I tried to follow the proposed default project structure closely. However, this is all a matter of personal taste.
Let’s get started!
First we’ll create the default project structure and install the libraries. Open up a file manager and create a folder structure like the one below. I will explain the purpose of these folders in a minute.
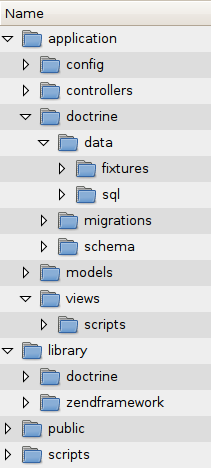
Basic Folder Structure
That’s a lot of folders, but most of the should be familiar if you made a Zend Framework application before. The following things are different:
application/doctrine/: This one contains all the doctrine data files, such as sql and yaml schemas, migrations, data dumps, …application/models/: Doctrine will automatically generate model files in this directory, easily usable from within your Zend Framework application.library/: Normally, you would just install your copy of the Zend Framework into the library folder. In our application, we need two libraries: the Zend Framework and Doctrine. Therefore, we make two subdirectories and we’ll install the libraries there.scripts/: Doctrine comes with a handy command line script, we’ll store it here (as advised in the proposal mentioned above).
Our next step is installing the Zend Framework and Doctrine. Download the latest versions from the respective websites and unzip the library (for ZF) or lib (for Doctrine) folders into the folders we just created. It should look somewhat like this:
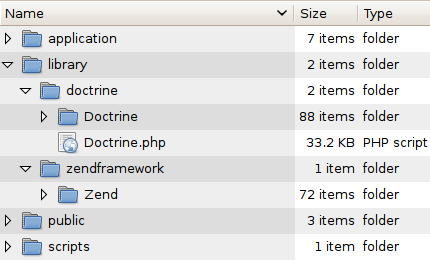
Zend Framework and Doctrine installed
Time to get bootstrapping
If you remember correctly from the Zend Framework Quick Start, we’ll have to create a bootstrap.php file. We’ll do this now, with some modifications to enable the use of Doctrine.
First, we’ll create the public/index.php and public/.htaccess file. Fire up your favorite editor and grab the pieces of code below (note: you can also get all the source files using git, see the appendix near the bottom for more details):
<?php
require '../application/bootstrap.php';
RewriteEngine on
RewriteCond %{SCRIPT_FILENAME} !-f
RewriteRule ^(.*)$ index.php/$1
As you can see, these are the same like every other Zend Framework app. The application/bootstrap.php file looks a bit different. I have split it up into two files: application/bootstrap.php and application/global.php. The former takes care of handling client requests, the latter includes all the needed files. I’ve split this up because the code from global.php is also needed in the Doctrine command line script (which we’ll see in a minute).
<?php
error_reporting(E_ALL | E_STRICT);
ini_set('display_startup_errors', 1);
ini_set('display_errors', 1);
date_default_timezone_set('Europe/Brussels');

/*
 * Setup libraries & autoloaders
 */
set_include_path(dirname(__FILE__).'/../library/zendframework'
        . PATH_SEPARATOR . dirname(__FILE__).'/../library/doctrine'
        . PATH_SEPARATOR . dirname(__FILE__).'/models'
        . PATH_SEPARATOR . dirname(__FILE__).'/models/generated'
        . PATH_SEPARATOR . get_include_path());
require 'Zend/Loader.php';
Zend_Loader::registerAutoload('Zend_Loader');

/*
 * Set super-global data
 */
Doctrine_Manager::connection("mysql://user:pass@localhost/database");

/*
 * Configure Doctrine
 */
Zend_Registry::set('doctrine_config', array(
        'data_fixtures_path'  =>  dirname(__FILE__).'/doctrine/data/fixtures',
        'models_path'         =>  dirname(__FILE__).'/models',
        'migrations_path'     =>  dirname(__FILE__).'/doctrine/migrations',
        'sql_path'            =>  dirname(__FILE__).'/doctrine/data/sql',
        'yaml_schema_path'    =>  dirname(__FILE__).'/doctrine/schema'
        ));
require dirname(__FILE__).'/global.php';

Zend_Controller_Front::run(dirname(__FILE__).'/controllers');
Let’s go over this step by step:
error_reporting(E_ALL | E_STRICT);
ini_set('display_startup_errors', 1);
ini_set('display_errors', 1);
date_default_timezone_set('Europe/Brussels');
It’s always a good idea to setup decent error handling and a timezone. Nothing special here.
/*
 * Setup libraries & autoloaders
 */
set_include_path(dirname(__FILE__).'/../library/zendframework'
        . PATH_SEPARATOR . dirname(__FILE__).'/../library/doctrine'
        . PATH_SEPARATOR . dirname(__FILE__).'/models'
        . PATH_SEPARATOR . dirname(__FILE__).'/models/generated'
        . PATH_SEPARATOR . get_include_path());
require 'Zend/Loader.php';
Zend_Loader::registerAutoload('Zend_Loader');
This is where we hook up Doctrine. As you can see, we set our include path to include the Zend Framework and Doctrine. We also include the folders where doctrine will generate it’s model files. Note that we don’t have to setup the Doctrine autoloader. Using the Zend Loader works just as well, as long as we setup the include_path correctly. Be warned: in the releases of ZF prior to 1.8, there is a bug that causes ZF to print (harmless) warnings when using Doctrine Class Templates. It will be fixed as soon as version 1.8 is released (the fix is already in Subversion).
/*
 * Set super-global data
 */
Doctrine_Manager::connection("mysql://user:pass@localhost/database");

/*
 * Configure Doctrine
 */
Zend_Registry::set('doctrine_config', array(
        'data_fixtures_path'  =>  dirname(__FILE__).'/doctrine/data/fixtures',
        'models_path'         =>  dirname(__FILE__).'/models',
        'migrations_path'     =>  dirname(__FILE__).'/doctrine/migrations',
        'sql_path'            =>  dirname(__FILE__).'/doctrine/data/sql',
        'yaml_schema_path'    =>  dirname(__FILE__).'/doctrine/schema'
        ));
These final bits of code perform two tasks. First, we set up the database connection. To keep it simple, I’ve just hardcoded this string value in. In a more real system, you’d like to use something like Zend_Config. I leave that up to you as an excercise. Secondly, this piece of code will setup the paths for the Doctrine command line tool (which generates all code and database schemas). I store this array in the Zend_Registry, which is a general purpose object store, a place where you can store objects and retrieve them at a later point of execution.
Change the line which sets up the Doctrine connection to match the details of your system. You should point this to an empty database. We’ll populate this database later on.
The application/bootstrap.php file should not contain any surprising code. Again, I kept this example as simple as possible.
Finally, we’ll set up the Doctrine command line interface:
#!/usr/bin/env php
<?php
require dirname(__FILE__).'/../application/global.php';

$cli = new Doctrine_Cli(Zend_Registry::get('doctrine_config'));
$cli->run($_SERVER['argv']);
Make this script executable: chmod +x scripts/doctrine-cli and you are ready to go.
Building an application
Now that we have the basic scripts in place, let’s build a simple application that uses the Zend Framework and Doctrine. We’ll build a very simple message wall, a place where users can post a message and view others’ messages.
We will make this very simple: only one controller and one view script. Grab the following files:
<html>
<head>
<title>ZF & Doctrine example</title>
</head>
<body>
<h1>Submit a message:</h1>
<?=$this->form?>
<hr />
<h1>Messages posted:</h1>
<!-- TODO: Show messages here -->
</body>
</html>
<?php
class IndexController extends Zend_Controller_Action
{
    public function indexAction()
    {
        $form = $this->getForm();
        $req = $this->getRequest();
        if ($req->getPost() && $form->isValid($req->getPost())) {
            // TODO: Insert message into database
        }
        $this->view->form = $form;

        // TODO: Retrieve all messages.
    }

    private function getForm()
    {
        $form = new Zend_Form();
        $form->addElement('text', 'name', array(
                    'label' => 'Your name',
                    'required' => true
                    ));
        $form->addElement('textarea', 'message', array(
                    'label' => 'Message',
                    'required' => true,
                    'rows' => 4
                    ));
        $form->addElement('submit', 'send');
        return $form;
    }
}
?>
As you can see, there are three big TODO items left: one in the view script and two in the controller. These are the places where we will hook up Doctrine. But to do that, we’ll need to define some data objects first. We’ll come back to the controller and the view script later, but first, it’s time to create a database schema.
Defining the database schema
Doctrine allows you to specify your database schema in YAML files, a very simple textual representation. We will use this and let doctrine generate the PHP files automatically. I defined the following schema:
---
Message:
    columns:
        id:
            primary: true
            autoincrement: true
            type: integer(4)
        posted:
            type: timestamp
        name:
            type: string(255)
        message:
            type: string
In this application, we only need one very simple object: Message, with four columns: the obligatory unique id, a timestamp when the message was posted, the name of the poster and the message itself.
We can now employ the doctrine command line to generate the model files and database tables. From your shell, execute the following:
$ ./scripts/doctrine-cli generate-models-yaml
generate-models-yaml - Generated models successfully from YAML schema
$ ./scripts/doctrine-cli generate-sql
generate-sql - Generated SQL successfully for models
$ ./scripts/doctrine-cli create-tables
create-tables - Created tables successfully
If all went well, this shouldn’t have printed any errors. If it did, make sure your connection details are set up correctly.
Wiring it together
Now let’s tackle the final bits of TODO. We’ll replace them step by step. The full code for the completed files is available at the end of the article. First, we’ll add code to store a message. Replace the following:
// TODO: Insert message into database
By this:
$message = new Message();
$message->fromArray($form->getValues(true));
$message->posted = new Doctrine_Expression('NOW()');
$message->save();
As you can see, we use an object of the class Message. This class has been automatically generated by Doctrine. You can find it in application/models/. The autoloader takes care of all the needed loading.
We’ll also need to retrieve the messages to show them. First the controller. Replace:
// TODO: Retrieve all messages.
By:
$messages = Doctrine_Query::create()
             ->from('Message m')
             ->orderBy('m.posted DESC')
             ->execute();
$this->view->messages = $messages;
Again, very simple. I used a DQL query to sort reverse-chronological.
Now all that’s left is to display these messages in our view script. Again, replace:
<!-- TODO: Show messages here -->
By:
<?php foreach ($this->messages as $message): ?>
    <h2><?=$message->name?> (<?=$message->posted?>)</h2>
    <?=$message->message?>
<?php endforeach; ?>
And we’re done, the result should look somewhat like this:
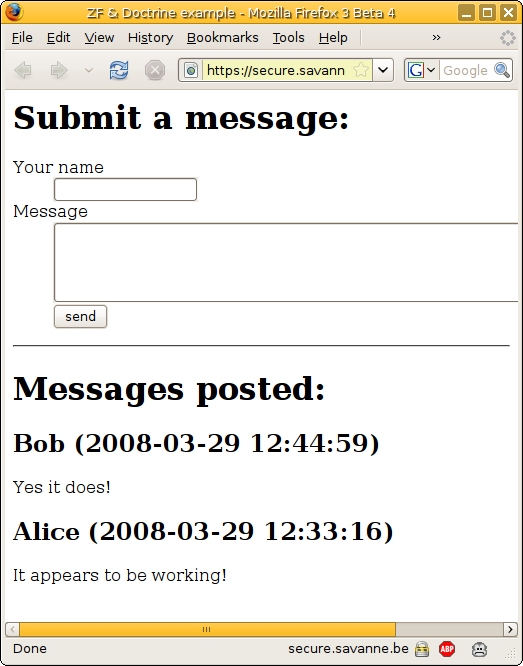
Don’t use this application in real-life though, to focus on the important parts, I left out stuff like input escaping. You can add this as an exercise.
Conclusion
So there you have it, a clean & simple application using both Zend Framework and Doctrine. As both follow somewhat the same filosophy, it’s possible to integrate these in a very clean way, making application building a real pleasure.
If you have any remarks, comments or questions, feel free to email me, or comment on my blog.
Appendix: Getting the code
If you don’t like copy pasting code, I’ve got another option for you: get it through git. I’ve put both the initial version (with the TODO items present) and a finished version online in a git repository. Here’s how to use it:
- Get a clone of the repository:
git clonehttps://github.com/rubenv/ chatapp.git This will get you a copy of the unfinished version - If you rather have a look at the finished version, execute the following:
git checkout -b finished-versionorigin/finished-version - You can switch back and forth between the two versions by using
git checkout master(for the unfinished version) andgit checkout finished-version(for the finished version).
Appendix: Complete files
<?php
class IndexController extends Zend_Controller_Action
{
public function indexAction()
{
$form = $this->getForm();
$req = $this->getRequest();
if ($req->getPost() && $form->isValid($req->getPost())) {
$message = new Message();
$message->fromArray($form->getValues(true));
$message->posted = new Doctrine_Expression('NOW()');
$message->save();
}
$this->view->form = $form;
$messages = Doctrine_Query::create()
->from('Message m')
->orderBy('m.posted DESC')
->execute();
$this->view->messages = $messages;
}
private function getForm()
{
$form = new Zend_Form();
$form->addElement('text', 'name', array(
'label' => 'Your name',
'required' => true
));
$form->addElement('textarea', 'message', array(
'label' => 'Message',
'required' => true,
'rows' => 4
));
$form->addElement('submit', 'send');
return $form;
}
}
?>
<html>
<head>
<title>ZF & Doctrine example</title>
</head>
<body>
<h1>Submit a message:</h1>
<?=$this->form?>
<hr />
<h1>Messages posted:</h1>
<?php foreach ($this->messages as $message): ?>
<h2><?=$message->name?> (<?=$message->posted?>)</h2>
<?=$message->message?>
<?php endforeach; ?>
</body>
</html>